Showing posts with label Tips and tricks. Show all posts

Wednesday, 22 April 2015

Here is how to increase internal memory of any android device.

Are you facing low internal memory to install application on you android phone? Then this article is for you. Many of the budget android phones come with low internal memory to install applications. For that many of us who wants to install lots of applications or games face a lot of trouble due to low internal memory.

So if you are of that group then follow the instructions below to increase internal memory of your android smartphone.

Things you need:

  1. Rooted android phone. If your phone is still not rooted then follow the instructions mentioned here.
  2. 4GB SD card.
  3. Link2SD software. You can download the software directly from Google Playstore. Here is the link.
  4. A windows pc.
  5. Mini tool partition wizard. Download from here.
Procedure:
Minitool Partition wizard

  1. At first back up everything which are important.

  2. Next format your SD card.

  3. Plugin your phone using data cable and enable USB debugging. (To enable USB Debugging go to Setting>Developer options>Tick on USB Debugging)

  4. Now enable Mass storage mode on your android phone.
    You can do that either by swiping the notification bar and clicking USB Storage or by going to Connectivity>Usb connection mode>Mass storage mode(MSC).

  5. Now install Mini tool partition wizard in your desktop or laptop and open the software.

  6. Select your SD card in Mini tool partition wizard.

  7. You will find a Move/Resize option at the top bar of Mini tool partition wizard. Click on that and you will see something like the image below:

    Minitool Partition wizard[/caption]

  8. Now on "Unlocated space after" field use your desired size which you want to add in your internal memory (This memory will act as internal memory). We suggest to use 1024mb.

  9. After adding your desired size click on "OK" button.

  10. Now you will see a unallocated space right below your memory card partition. Right click on that and click "Create".
    Minitoo partition wizard

  11. A pop up message will show up. Ignore that message and hit "Yes".

    Mini Tool

  12. Now right click on that unallocated partition again and click format. A pop up message will show up. Select "Primary" in "Click As" section and "Fat 32" in "File System" section. Now hit OK and then Apply (Found on the top left corner of mini tool partition wizard.)

    file

    file (3)

    file (1)

    file (2)

  13. Now disconnect your phone from you PC.

  14. Go to Setting>Security and tick on Unknown sources.

  15. Install Link2SD and open the app. You will see a pop up message. Select "FAT32" from that pop up message and hit OK.
    Link2SD

  16. A superuser pop up message will appear. Give permission, just hit the "Allow" button.
  17. Now restart your device. And again open the Link2SD app. Go to menu>configure and then select "AutoLink". From now on whenever you install an app it will go to the second partition of the SD card and your internal memory will remain unused.

    Verify
If you face any problem when installing, just let us know by commenting below.

Wednesday, 25 March 2015

How to fix Google Play Store Connection Error, Connection Time Out on android.

How to fix Google Play Store Connection Error, Connection Time Out on android.
Android users are increasing day by day. Many of the android users are facing problems with their Google Play Store like connection Error, connection Time Out etc. It' is really an annoying problem for android users. So here is an article on how to fix Google Play Store Connection Error, Connection Time Out problems. For example you tapped on the Google Play Store and suddenly an error message shows saying, "Connection Error" or something like "Connection Time Out". Its really frustrating for everyone

Problem type:

  • Shows connection error when you try to open Google play store or download something.
  • Sometimes shows time out if you tap on download button.
  • Suddenly shows connection time out when downloading  an application from Play Store.
Reasons:

  • This type of problems generally occurs after rooting android devices.
  • Root permission based applications also causes this problems in many cases.
To fix these problems you have to do the following:

Method 1:

  • First download Root explorer from the following links:
    Download Links: Link 1 | Link 2 | Link 3
  • After downloading the app install it and open the app. Allow root permission for the app.
  • Now using root explorer find the root directory of you phone and find the folder labeled "etc".
  • Now find a file named "Host file".
  • Tap and hold on that file and select open in text editor.
    Note: Please back up the host file before making any change.
  • Now delete the line "127.0.0.1 localhost" from the host file and save it.
    Note: Don't touch any other line or make any change.
  • Now open Google Play Store and download with freedom. No error message will appear now.
Method 2 (For those who are using Freedom):

Android users who uses "Freedom" app might face the same issues. Method 1 might not be applicable for those. So if you are "Freedom" app user then try following the below instruction:

  • First connect your device to Internet.
  • Now open Freedom and close it after running for 1 minute.
  • Now tap on Google play store and download your desired app. No error message should be displayed.

Saturday, 28 February 2015

Here is how to enable, configure and use guest mode on LG devices.

Here is how to enable, configure and use LG's guest mode.

Guest Mode

We are here today to show you how to enable, configure and use guest mode found in most of the LG's Android based devices. However it is not LG's exclusive feature as android has introduced much before. So let's start. To start first you need to know what is Guest Mode in LG's smartphone.
What is Guest Mode on LG's android smartphones:
Guest mode is nothing but a different account/environment for a guest user. Just like the windows guest mode it's used for creating a different environment. However it will not create a separate account on LG's smartphone for guest. It will only create a separate environment with limited access or permission to applications. It means that the guest can only access to selected applications.
It's really a handy feature to keep your personal informations safe. But guest user can still access to data of the app to which you give them permission to access.
Supported devices:
You have to have a guest mode supported LG device to use guest mode as there is not specific app to enable guest mode. The guest mode was first introduced on LG G2 by LG. LG Realm also came with the feature. As LG Realm was able to handle guest mode, there is a huge chance that other LG devices will also come with guest mode.
Here is a list of supported devices:
  1. LG G2
  2. LG G3
  3. LG Flex
  4. LG Flex 2
  5. LG Realm
How to enable Guest Mode:
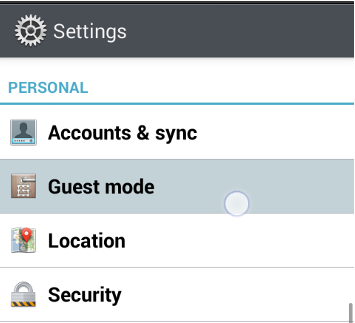
If you have a supported LG device and you want to enable guest mode then first go to "Settings". Then tap on the "Personal" menu. Find "Guest mode" and tap on that. You will see an On/Off toggle at the top right corner of the "Guest Mode". Then simply turn that on.
Here is the full path at a glance:
Go to Settings > Personal > Guest Mode > On/Off toggle (at the top right corner).
After truing it on a pop up window saying to configure screen pattern lock will come up. Simply configure a new pattern lock as the guest mode will not be activated without a pattern lock. To configure Pattern lock tap on Set pattern and set your desired pattern which will be used by the guest users.
How to configure Guest Mode:
So now you have to set the apps which will be accessible from guest mode. Note that, guest mode does not create a separate account. So, guest can access your applications data which are given permission for access.
To set the apps simply tap on the set apps button and find the edit apps at the top right corner. Now tap on that and choose the apps. Now tap on exit.
Full path at  a glance. 
First go to Set apps in the settings > Edit apps > Choose your apps > Ok > Exit.
How to use Guest Mode:
So now to enter the guest mode in LG's android Smartphone simply open the screen lock with the pattern which you setup for the guest mode. If you open the screen lock using that screen lock pattern (set up before for guest mode) then you will only see the selected apps which you gave permission. 
If you provide your usual pattern then you will be able to go back to your administrative mode....

Wednesday, 25 February 2015

Here are 6 common problems of Sony Xperia Z3 and their solutions.

Here are 6 common problems of Sony Xperia Z3 and their solutions.


Sony’s new flagship device, the Sony Xperia Z3 is one of the best phones out there in the market for its amazing performance, stunning build quality and camera. When it comes to its build quality it’s one of the well known phones for its design language. It’s one of the top android devices of 2014. But technology may not be perfect for all the time. Just like most of the big buddies you may face some common problem with your Xperia Z3 also. So to help you, we have tried to find out the most common problems faced by Sony Xperia Z3 users and their solutions.
Note: These problems are not faced by all Sony Xperia Z3 users. You might face these problems occasionally.
Below are the 6 common problems and their solutions:
Problem #1 :
Color Shading: Sony Xperia Z3 users have reported that they sometimes face color shading problem when they try to take pictures. A pink or reddish circle may appear in the center of the photographs.
Solution:


  • First restart your phone.
  • Download PC Companion for your PC.
  • Back up everything important.
  • After that connect your phone with data cable. Open PC Companion and perform a software repair.
  • If that do not fix the problem try to adjust the camera settings.
  • Avoid taking photographs in Low-light condition because the flash makes the problem worse.
  • Wait for an update from Sony because a software update might fix this problem.

Problem #2:
Unresponsive Screen: Some of the Xperia Z3 users complained that the touch screen does not responses when they are using on screen keyboard.
Solution:


  • Some time screen protectors create this short of problem. So first try to figure out if the screen protector is causing this problem or not.
  • If it is not a problem caused by screen protector then restart your phone and use repair firmware to find out whether the problem is a hardware issue or software issue.
  • Factory reset your phone and sees if the problem is solved.
  • If still the problem exist contact Sony as this might be a hardware issue.

Problem #3:
Slow performance and lag: Though Sony has packed the Z3 with powerful processor and GPU sometimes users face some lag when playing games, videos or other applications.
Solution:


  • First detach the micro sim slot and press the yellow restart button to restart your phone.
  • If the phone still lags check the RAM usage and find the app which is consuming the most RAM. Uninstall that app if that’s third party app and not much important.
  • Attempt a factory reset (Back up all necessary data before factory reset).
  • Update all the applications and the firmware if available.
  • Make sure stamina mode is disabled. If not then try disabling stamina mode.

Problem #4:
Slow charging: Many users complained that the Sony Xperia Z3 has slow charging problem and takes too much time for full charge.
Solution:


  • Check the power adapter and make sure that the adapter is working fine by charging another device using the same charger. If the adapter is the problem of slow charging then ask for replacement.
  • Make sure the data sync. and charging cable are properly connected.
  • Always use Sony branded charger and cable for your specific model as alternative cable and charger may led to slow charging.
  • If still the problem goes and the phone takes more than 6 hours to fully re-charge then contact Sony.

Problem #5:
Wifi Connection problem: Some users said that the wifi signal is always poor in their Xperia Z3.
Solution:


  • First go to wifi settings and select your connected network. Tap on forgot network and then connect again using necessary settings.
  • Turn off the wifi router and the Xperia Z3. Wait 1 minute before turning them on again.
  • Disable stamina mode because the stamina mode affects the performance.

Problem #6:
Battery drains fast: The Sony Xperia Z3 comes with a large battery. But some users complained that their battery drains quickly.
Solution:
  • The problem may occur due to third party apps. Go to settings and then battery and see which applications are consuming the battery most. Try uninstalling them if they are not necessary.
  • Try to uninstall the games and apps which consume the battery most.
  • Turn of vibration.
  • Dim the display.
  • Enable stamina mode if you need more battery backup rather than performance.
  • Turn off wifi, Bluetooth, GPS and NFC if not required.

Here are some useful tips you may like:
For force reset try following the below instruction:


  • First remove the cover protecting the micro SIM slot.
  •  After that you will see a yellow restart button.
  • Take a small tip and hold that button until the phone restart.
For factory reset try the instruction below:


  • First backup everything which is important.
  • Then go to settings > Backup and reset > Factory reset.
  • Check the “Erase internal Storage” box.
  • Tap on “Reset Phone”.

Tuesday, 24 February 2015

Here is how to unlock Samsung Galaxy Note 4.

So many of you are a great fan of Samsung Galaxy Note 4 and you want to use it in different network. Or sometimes you love the Samsung Galaxy Note 4 but you don't like your network carrier or may be you are going to travel to a new country and want to save some bugs but using new sim cards rather than roaming. For all of that you have to unlock your Samsung Galaxy Note 4. However unlocking a phone is now legal in USA. So below is how to unlock Samsung Galaxy Note 4:
Here is how to unlock Samsung Galaxy Note 4.

1. Find Your IMEI:
The IMEI or the "International Mobile Station Equipment Identity" is required to gain your phone's unlock code from the database so its important to find out your Galaxy Note's IMEI no.
Here is how to find out IMEI no in Galaxy Note 4:
  • Go to settings.
  • Go to "About device" option in the settings.
  • Tap on "About device".
  • Find "Status" and tap it.
  • Now write down the IMEI no. without any spaces or dashes.
2.Buy an Unlock Code:
Now you have to buy an unlock code for your Galaxy Note 4. Find by Googleling it using the terms "Samsung Galaxy Note 4 unlock code".
After you have find out your desired/suitable supplier follow their instructions to purchase a code.
3. Unlock you Galaxy Note 4 using the code:
Now using the code you can unlock your Galaxy Note 4. To do so follow the steps provided below:
  • First remove your current carrier's sim card and replace that with a new carrier's sim card which you want to use.
    Note: The new sim card should be active.
  • Now boot your device and you will be asked to enter an unlock code.
  • Now input your unlock code carefully which you bought from the supplier, triple check the code then hit OK.
  • You can provide the unlock code for a limited time after which you will never be able to unlock your phone.
    SO BE CAREFUL.
  • If the code was successful than bang! But if the code fails then contact the supplier from where you bought the code before reentering the code as you can try it for a limited time.
Note: If your data signal is not showing though the unlock was successful don't become worried. It may be due to the settings, means the settings was not automatically set up. You have to set up your access point settings either manually or you can contact your carrier for settings.

Here is a video of Android Authority showing the full process:

Saturday, 21 February 2015

Here is how to install Android Lollipop on Samsung Galaxy S4.

Samsung has released the Lollipop update for the GS-4 2 weeks ago in Russia. The international update will be on the air soon. But still if you want you can install the Android 5.0.1 which is named Lollipop on you Galaxy S4. To do so follow all the instructions below:
1. Update and install Lollipop 5.0.1 using kies in Samsung Galaxy S4:
    Its the easiest method to update your Samsung Galaxy S4 and get the latest android version. Download the latest Kies from the official site. To download click here. After downloading kies install it in your pc and connect your phone via USB cable. Run Kies in your pc. It should automatically notify you that you Galaxy has an update (if connected with Internet). Then follow the steps shown by kies to start the update process. If kies don't show the update then follow the next method shown below.
Here is how to install Android Lollipop on Samsung Galaxy S4.
2. Flash using oDin:
    Note: If you are using a phone with contract then we recommend not to follow this steps. However it may still work but it's only recommended for the international versions.
   
To start the update process first download all the required softwares and files listed below:
Make sure you have fully charged your phone before the process, enabled the USB debugging (Settings > Developer Options) and backed up all the necessary files.

Here is how to install Android Lollipop on Samsung Galaxy S4.


Instruction for installing Lollipop on Galaxy S4:
  • First unzip/extract the downloaded firmware on your pc.
  • Open the Odin and lauch it. (You don't have to install it. It's download and play type.)
  • Press Volume Down + Power + Home button all together to boot your Samsung Galaxy S4 in download mode.
  • Now connect your device using USB cable with your pc.
  • You will see a blue box next to ID:COM in Odin which means Odin has recognized your phone.
  • Now only check the Auto Reboot and F.Reset Time boxes in Odin.
  • Now find AP button and click on it.
  • Show the tar.md5 file from the extracted folder in your pc and then hit start.
  • Wait for the process to finish.
    Note: Do not disconnect your device during process. This might brick your phone.
  • A green pass box will apear if successful.
  • Once your Galaxy S4 boots up you will find it's running on the latest Android Lollipop!
Special Note: We are not responsible for any kind of damage. Please follow the instructions at your own risks and make sure you follow all the instructions correctly.

Here is how to increase Samsung Galaxy S4"s performance.

It's been a while since Samsung Galaxy S4 has been released. Comparing to Samsung's latest flagship devices like Samsung Galaxy S5 and Note 4 it may seem a little bit sluggish as it's internal specs are not as fast as the new flagships but you still can make your Galaxy S4 run faster. So below are some tips to make your S4 run faster.


how to increase Samsung Galaxy S4"s performance.

1. Update your Android version:
    Android kitkat update was on the air few months ago. Some S4 users have complained that the kitkat update caused them a little bit problems. Yes, the Android Kitkat update is causing a little bit problem but we hope the Lollipop update will fix all the issues. The Lollipop update was announced for Samsung Galaxy S4 few months ago and its on the air in some regions. We don't know the reason why Samsung is taking time to release the Lollipop update in some regions. But if you are from those regions in which the update is still not available you can still get the update manually because the international update was released on Samsung's website.
Here is how to install Android Lollipop on Samsung Galaxy S4.
2. Optimize TouchWiz for the best performance:
    Samsung's TouchWiz has its pros and cons but in some cases it slows down your Galaxy S4 due to some unnecessary effects. To turn them off you have to become the Developer of the GS-4. If you have already enabled the developer option then just go to the following:


how to increase Samsung Galaxy S4"s performance.

  • Go to Settings > More > Developer Options
  • Find the Animation Scale, Transition Animation Scale and Animator Duration Scale options.
  • Turn them all or reduce the scale. (By default it will be set on 1X).

Special note: If you are not still a developer or if you can't find the developer option in the settings then do the following:
  • Go to About Device
  • Scroll to Build Number
  • Tap on build Number for five times
3. Try other launchers :
    TouchWiz is not the smoothest launcher in some cases so it would be a good practice to use third party app launcers like Nova Launcher, Go Launchers or others.
To Download Nova Launcher click here.
To download Apex Launcher click here.
4. Disable S Voice:
    S voice is Samsung's voice control app. Its a great app and handy tool for daily use. But it may make your S4 run slow. So if you don't use the S voice its good to disable it. Because whenever you tap the home button the S voice eat's up some ram and waits for your second tap. So just disable the S voice if you don't use it. To do so go to Menu > Settings > Open via the home key and disable it.
5. DIable widgets:
   Widgets are great. They make your phone look beautiful and they are handy also. But do you know they uses the battery and eats ram the most? So if you feel you don't need widgets then disable them.
To get the best results make sure you follow all the necessary steps carefully.

Saturday, 14 February 2015

An article on how to root android phone and become the superuser.

kingo android root

So you are here to learn how to root your phone? Before learning take a look on what is root and why it is done.
What is Rooting?
Ever heard the term "Jail Breaking" of iPhone? Hope you are familiar with "Jail breaking" of iPhone. Well rooting is a kind of Jail breaking which allows an android user to perform superuser stuffs like tweaking the OS or removing bloatware etc.
With rooting your will get the permission to get the entire OS which is called root access. You will get a new world of tweaking, customizing and do even more. You can flash your phone with custom rom, overclock your processor even underclock!
Here are some advantages/benefits of Rooting:
  • Root permission.
  • Possible to uninstalled preloaded apps, unnecessary system apps which are know as bloatware.
  • Ability to install custom Roms.
  • Special apps which will block annoying advertisements.
  • Overclocking or underclocking your phone.
  • Complete customization of your android phone.
  • Unlock bootloader.
  • Changing boot animations.
  • Increasing battery performance.
  • Clearing junks.
  • Many more!
Here are some disadvantages of Rooting:


  • Warranty void: If you are going to root your android phone then keep in mind that you are also going to void your warranty!
  • Bricking your phone: If you don't follow the instruction carefully there is a higher chance of bricking your phone.
  • Security risks: You will face some security risks. If you use Google wallet often then rooting is not for you as Google wallet refuses to support on rooted apps.
What is important before rooting:


  • Back up necessary data before rooting.
  • Back up your stock ROM.
  • Make sure your phone is fully charged.
  • Turn on USB debugging. To do so follow the path:
    Settings> About Phone> Developer Options> check USB Debugging.
  • Install Android SDK. You can download it from here (Follow the provided instructions to install Android SDK).
  • Unlock you bootloader.
    To unlock bootloader of Motorola, Sony or HTC you can follow the links provided below:
    1. Motorola bootloader unlock program.
    2. HTC bootloader page.
    3. Sony bootloader unlock.
So now you are ready to root your phone. Bellow are two methods to root your phone. Note that all methods doesn't work on every phone. You have to find out which one works for your phone.
Method #1: Using Towelroot
Rooting through Towelroot is one of the easiest method. It was developed to root AT&T's Samsung Galaxy S5 but it is supported by other devices also.
Its easy to use. Just download the application, install it and root your device. No computer is required to root with this application. However it will only work on the devices which have karnel build before June 3, 2014.
Here is a detailed instruction:

  1. To install towelroot you have to enable the option called "Install unknown applications".
    To do so follow the path:
    Settings> Security> Unknown Sources.
  2. Go this link using your phone browser and simply tap on the big red "λ" (Lembda) icon.
  3. Restart your phone and you will see a superuser all installed in your phone which means your phone is rooted. If you don't find the superuser or supersu application than try other methods.
Note: Use your default browser (which comes with your device) to go to the link above.
Method #2: Using Kingo Android Root
This application is windows based application which means you need a windows computer to root your device. Below is the instruction.
Instruction to root your phone using Kingo Android Root:

  1. First check if your device is compatible with this software from this link.
  2. If your phone is listed then download the Kingo Android Root from here.
  3. Install the app in your pc.
  4. Enable usb debugging in you phone.
    Settings> About Phone> Developer Options> check USB Debugging.
  5. Run the Kingo software in your Pc and connect your phone using a cable.
  6. The application should detect your phone and will ask you if you want to root your phone.
  7. Click on "Root" and let the application do the rest for you.

Friday, 13 February 2015

Here is how to get Android L navigation buttons on any android phone.


The latest version of Android is the "Android L" which replaced the usual navigation buttons with triangle, circle and square buttons. That means the usual navigation buttons which we've been using since the "Ice cream sandwich" released. Everyone are not a fan of these buttons called the "Play Station Style" buttons. But i think they are modern enough to match the designs of modern smartphones. You will find the "Play Station Style" buttons on the the Nexus 6 (Click here to buy Google Nexus 6 from Amazon.) which is currently running on Android L. But you can get them if you like them in your android phone which may be running on "Kitkat" or "Jelly Beanusing a simple Xposed module created by XDA user Prithvee.. Thanks to him for this module. So here is the article on "How to get Android L navigation buttons".
You need to root your device and Xposed Framework installed in you Phone. Follow the instructions bellow:
  1. Root your device. (Here are some methods to root your phone, Link)
  2. Install Xposed Framework on your device. You can download the Xposed Framework from here.
  3. Download and install the Xposed module from here.
  4. After installing the module activate it from the Xposed framework.
  5. Finally restart your phone and you are done to use the new navigation icons!

Some common problems with Nexus 6 and their solutions.

Google Nexus 6 problems and solutions.

Nexus 6 is one of the top android device with high end specs. Nexus 6 is also one of the toughest competitors in the smartphone market with the latest android version and promised up-gradation. Though its one of the top smartphone with high end specs sometime it causes some problems.
Here is an article with the most common problems and their solutions:
Note: These problems are occasional and you might not face these kind of problems. (Not every Nexus 6 users will face this issues.)
Click here to buy Motorola Google Nexus 6, Midnight Blue 32GB (AT&T) 
Problem #1: Rebooting randomly
Some of the Nexus 6 users have reported that their device sometimes reboots without any reason. Sometimes it happens continuously. It reboots to lock screen and exactly when the phone is unlocked the phone again reboots.
Solutions:

  1. Mostly fragmented data on your phone cause this kind of problems. So back up your important data and perform a factory reset.
    Caution: You will loose everything after performing factory reset. So back up your all important data such as: contact, messages etc.
  2. Disable default messaging app and try to use hangout instead.
  3. Enable Google Play services.
  4. Make sure your phone is charged fully.
  5. Wipe cache partition. It will wipe all fragmented data.
Problem #2: Problem with bluetooth connectivity.
A number of Nexus users have faced this kind of bluetooth connectivity problems. Its is commonly a bug with the bluetooth.
Solutions:
  1. Try your bluetooth turn on and off and then turning on again.
  2. If the problem still continues try to clear the cache for the bluetooth. To do so follow the path:
    Go to Settings > Apps > All > Bluetooth share > Clear cache. After that restart your phone.
  3. Using the upper path (Go to Settings > Apps > All > Bluetooth share > Clear data) also clear the data and then restart.
  4. If you still face the problem try to boot your phone is safe mode.
Problem #3: Quick battery drain/abnormal drainage of battery.
The Nexus 6 comes with a huge battery which should give you a pretty decent battery back up. But a group of users reported that they faced abnormal battery drainage though they used the device normally (No heavy gaming, Internet browsing etc).
Solutions:
  1. Third party applications might be causing this problem. So try to figure out the third party apps which are consuming the battery power from the battery option in the settings and try to disable the app if not used frequently.
  2. Try to uninstall power hungry apps one by one.
  3. Try to dim/lower your screen contrast if possible.
  4. Turn off the vibration.
  5. Update all your applications.
  6. Restart your phone.
Problem #4: Cloud printing
Sometimes the Nexus 6's cloud printing application is hard to keep running. It stops running and force close pop up comes up.
Solutions:

  1. Update your phone and Cloud printing application.
  2. Clear cache and data of Cloud print using the path:
    Settings > Applications > All > Cloud Print > Clear Data.
    Settings > Applications > All > Cloud Print > Clear Data / Clear Cache.
  3. Perform a factory reset to get rid of fragmented data.
Problem #4: Slow charging
A pretty common problem of Nexus 6 is slow charging. If you ever face this problem try following the instruction provided to increase charging speed.
Solutions:
  1. Close unwanted applications which are running background. Use "Back button" to exit from an application instead of using "Home Button". The "Back Button" completely close the application where the "Home Button" makes the application to run in background.
  2. Don't play game while charging, it consumes a lot battery and can affect the processor also.
  3. Check the cable and make sure that the cable is working fine.
  4. Charge directly from laptop or desktop.

Tuesday, 10 February 2015

Here is how to install CyanogenMod based Rom on Samsung Galaxy S3 Mini.

CyanogenMod on Samsunga Galaxy

I think everyone is looking for this trick who own a Samsung Galaxy S3 Mini. The CyanogenMod is pretty much popular now a days over android and there are a huge numbers of people who want to try CyanogenMod on their phone.
This guide will show you how to install and update CM based ROM on your Samsung Galaxy S3.
So let's get started:
Flashing from Stock:
  1. Make sure you have rooted your phone. If your phone is yet not rooted then root it. You can find several tips to root your Samsung Galaxy S3 Mini in this blog.
  2. Download the new version of CWM recovery from Google Play store.
    Here is the link: https://play.google.com/store/apps/details?id=com.koushikdutta.rommanager
  3. Find a suitable and stable ROM for your Galaxy S3 Mini and download the ROM to your SD card. You have two options to choose - 1. Oliver's CM ROM or 2. Maclaw's CM ROM
  4. Download Gapps to your SD card.
  5. Then reboot your phone to recovery mode.
  6. Select wipe data/Factory reset.
  7. Then go to advanced option and select wipe Dalvik.
  8. Then select format > system from the advanced option.
  9. After formating go back to main menu.
  10. In the main menu choose Install from SD card. After that select the path where you have download the file.
  11. Locate the ROM and select that.
  12. After successful installation  of the ROM go to point 10 again.
  13. Locate the Gapps and click on it.
  14. After installing the Gapps click wipe data.
  15. After wiping choose advanced and then click on wipe Dalvik.
  16. After that go to main menu again and reboot your phone.
  17. You are all done to use CyanogenMod on you Samsung Galaxy S3 mini!
Follow the above instructions clearly/accurately to get working CM ROM on your Samsung Galaxy S3 Mini.

If you already have CM ROM installed and you want to update or switch it then follow the below instructions:
  1. Find your desired/updated CM ROM and download it to your SD card.
  2. Reboot your phone to recovery.
  3. Wipe the cache.
  4. After that go to advanced menu and select wipe Delvik.
  5. After wiping go back to main menu.
  6. Select install from SD card.
  7. Locate your downloaded ROM and select that.
  8. After successfully installing the ROM do the 3 and 4 again.
  9. Then go back to main menu and reboot your phone.
  10. You are now done with installing/switching/updating your desired CM ROM.
You may brick your phone if you do not follow the instruction correctly. In case of briking your phone we are not responsible.

Click here to buy Samsung Galaxy S5, Black 16GB (Verizon Wireless)

Buy new Samsung Galaxy S5:

Sunday, 8 February 2015

Tips for making your android phone run smoothly for a long time.

Make your android run smoothly

Is your favorite android phone slow? Its really annoying to have a slow android phone. Do you know how to keep your android phone speedy? Well here are some tips which may help you to keep your android device speedy and run smoothly:

Ram properties
  • First of all, if your android phone becomes slow try to figure out the reason why your android phone is running slowly. There are many reasons which may led your phone to work slowly.
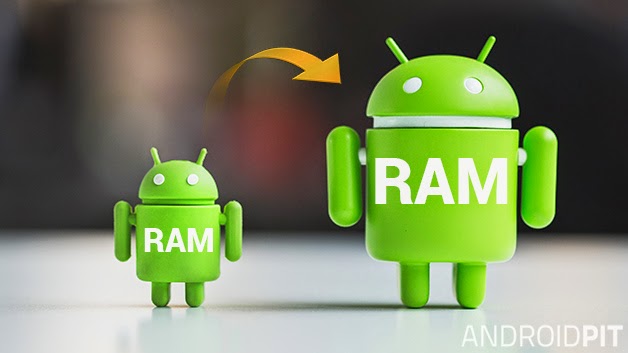
  • Ram controls the workability of android phones. So try to increase the free space of ram. Stop the background processes which are unnecessary. There are several apps which will do this for you.
  • Android is popular for its customization. In android you can use live wallpapers which will make your phone look pretty. But to keep your android phone fast, try not to use live wallpapers. Live wallpapers will increase your phones beauty, on the other hand it will decrease your phones performance also. As live wallpaper is animated wallpaper it will eat a huge amount of ram as well as battery every seconds. So just try to use normal wallpapers rather than live wallpaper. If you do so you will get a good battery life and a fast android phone.

  • Try to find out unnecessary apps and widgets and uninstall them as they slows your phone and also consume a huge amount of battery. So its a good practice to uninstall or delete unnecessary apps.
  • Exit the apps properly after using it. Almost all of the android users uses home button to exit from an app rather than quiting it. Using home button will actually make the app work on background which will case a slow phone. So exit the apps properly after using it. You can also use the built in task manager of android to exit the applications which are running in background.
  • Like windows android also perform well if the phone memory is kept free. So try to keep a good amount of free space in phone memory. Store all the data in external SD card.
  • You can also try to use 1Tap Cleaner, Android Assistance, App 2 SD, 360 Mobile Security to increase your phone's ram workability. 

Best Amazon deals of the day:

Friday, 6 February 2015

Install and play or run any android Software in windows pc without Bluestacks.

Are you looking a tips about how to install android on your windows based desktop or laptop? There are several methods to do so like: Blutestacks, Virtual box etc. One of the most popular way is to install and run android softwares and games in your computer is to install "Bluestacks" in your computer. I will show you about "How to install bluestacks and run android softwares in your windows based PC" later. "Bluestacks" is an emulator to run android softwares which is very heavy and will cause your PC to run slow. On the other hand "Virtual Box" doesn't support wifi. So today i am sharing this tips for those who doesn't have a powerful computer or have less ram or don't have GPU (as bluestacks works only if you have a decent GPU).


So to run android softwares and games in your windows based desktop or laptop you need a software named "Genymotion". To download the software you must sign up. Click here to sign up and download.
I found this software working fine with normal desktop which don't have any decent Gpu or decent amount of Ram.  The software is absolutely free. You have to select download with virtual box.
Screenshot:
Install and play or run any android Software in windows pc without Bluestacks.

Install and play or run any android Software in windows pc without Bluestacks.

Install and play or run any android Software in windows pc without Bluestacks.

After the download is completed you have to install it in your PC. You will find two files after the installation is completed. You have to open the Genymotion. "Don't touch the other file named Virtual box!" After opeing Genymotion you will find an option to select a ROM. A list of available devices will apear. Select your desired one from the list. It will download some source files.
Screenshot:

Install and play or run any android Software in windows pc without Bluestacks.

Install and play or run any android Software in windows pc without Bluestacks.

Install and play or run any android Software in windows pc without Bluestacks.


After completing the dowanload process click on play. It will take 3-5 minutes to open the application. So now your are ready to install andorid softwares in your winodws based pc. Enjoy!
Screenshot:
Install and play or run any android Software in windows pc without Bluestacks.

Install and play or run any android Software in windows pc without Bluestacks.

Install and play or run any android Software in windows pc without Bluestacks.

Install and play or run any android Software in windows pc without Bluestacks.

Thursday, 4 December 2014

How to block adult sites in windows.

How to block adult sites in windows.

Now-a-days there are millions of adult sites which are dangerous for children. There are several ways to block an adult sites. You can use paternal controls on windows or use browser extensions to block those adult sites. Today we will show you how to block adult sites in windows and Mac OS. However the tips to block using browser extensions and changing search engine settings will publish later on.

So here is how you can block adult sites in windows 8:
1. For this you have to first log into your administrative account. Then open the "Control panel", find "Network and Internet" and click on it.


"Network and Internet"


2. Then find "Internet option" and click on it. It will show up "Internet Properties". Click on the "Content Tab".

Internet properties.

3. Find the "Family safety" and click on that. It will show up a new window showing your accounts. Click on the account for which you want to block adult sites.

Family safety.

4. You will see a new window showing "User settings". You will find two options: "Family Safety" and "Activity reporting". Select "on, enforce current settings" under the "Family Safety tab".

Activity reporting.

5. Click on the "Web Filtering". You can find that option on the same window, right under the "Activity reporting" Tab.

web filtering.

6. You will find the option showing “can only use the websites I allow.” Click on that.

can only use the websites i allow.

7. Finally you will find several options for restrictions. Most of them will block adult sites by default. For example to block sites which are not suitable for children select "Designed for children."

Follow these steps and you will find that all the adult sites are blocked from your windows 8 PC.

For Windows 7 and Vista:

1. First log in to your windows 7 based PC from your Admin pannel. Click Start and open Control Panel. Find the “Set up Parental Controls” below the section labeled “User Accounts.” Click on the account from which you want to block adult sites. Click "on, enhance current settings" under the "Paternal Control".

Paternal control.

2. Click "allow or block specific program". 

allow or block specific programs.

3. A new window will appear. Click on the ""For kids can only use the programs I allow"" option. Select "High" or "Low" according to your restriction level. Close the window.
You have successfully blocked adult sites from your windows 7. This method is also applicable for Windows Vista.

Source: WikiHow
Find more tips and tricks and how to's on Android Myths.